

Canning Peaches in 16 Steps
So many fruits and vegies are tastiest when frozen, and freezing them is easier, too. Peaches, however, are the simplest of fruits to can (except for apricots, which don’t even have to be peeled) and we think they taste better canned than frozen, so almost every August I’ll can at least a dozen quarts of peaches.
Here’s how I do it. If you’ve never canned before, this will seem complicated. I promise you, however, that beautiful home-canned peaches are worth the effort, and after a couple of times, it will seem easier. This year, when it was all over, it hardly seemed like a chore at all.
This is also a project in which older children are useful. We’ve done it with another family, using assembly line work stations for the various steps: a skinning station, a halving and pitting station, a jar packing station, etc. We canned 50 quarts in one afternoon that way.
Supplies:
-
PeachesYou’ll need 2-2 1/2 lbs. of peaches (5 peaches or so) to make one quart of canned peaches. Buy freestone (aka cling-free) peaches and let them ripen until they are very ripe, but not mushy. I buy mine in 20 lb. boxes because that’s how they come packaged in my local supermarket.
-
SugarJust regular old white sugar. See step 7 below to estimate how much you will need. I like to have a 10 lb. (4 kg.) bag on hand because there’s nothing worse than running out of sugar mid-batch.
- Water bath canner including jar rack
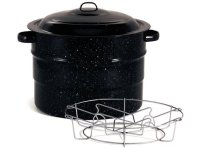 See photo at right. You will need one that’s 12-inches tall if you plan to can your fruit in quart jars. If you are purchasing a canner, be forewarned that many canners that claim to be made for canning quart jars are not really tall enough for the jars and the minimum 1-inch of water covering the tops of your jars required for safe-to-eat fruit, plus room enough to keep the rolling boiling water from sloshing out all over your stove top. If the one you already have is shorter than 12 inches tall, it’s probably best to settle for canning your fruit in pint jars.
 -
Canning jars
As many as you need for the amount of peaches that you have. Wide-mouth jars works best for canning peaches in halves (and halves require the least work), but standard mouth or gem jars work well for slices. -
Jar lids and bands
Enough for the number of jars you are canning and sized to fit the mouths of your jars. - Jar lifter
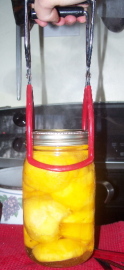
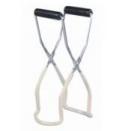 See photo at right. Barbecue tongs will work as well, but be sure to bend the tips in a bit so that they grip securely under the neck of the jars.
 - Magnetized lid lifter or kitchen tongs
- Canning funnel
- Several large spoons and a large ladle
- Dishwasher or large stock pot for sterilizing jars
- Large pot for scalding peaches before peeling
- Large pot for making syrup
- Medium pot for heating lids and rings
- Tea kettle
- Paring knife and table knife
- Anti-discoloration agent like Fruit Fresh
- Several clean kitchen towels
- Clean dishcloth
Instructions
1. Gather all your supplies together before you begin.
2. Hand wash the jars and let them air dry. If they are not very dirty and you are using a dishwasher to heat them, you may skip this step. But jars stored in the basement for a year can be very icky, and those you’ll need to wash thoroughly by hand before you heat them in the dishwasher.
3. Take the jar rack out of the water bath canner, fill it half full of water, and place it on the stove top on a large burner. Begin heating the water.
4. If you are heating your jars in a large pot on the stove, fill the pot with water and place a couple of kitchen towels on the bottom. Place your jars in the pot and begin heating. Once the water boils, you can turn the burner off and leave the jars in the water so they stay hot. If you are heating your jars in the dishwasher, put them in the diswasher now, but run the cycle so that the jars are still hot when you begin to pack the peaches.
5. Fill the large pot for scalding the peaches with water and being heating it. Wash the peaches and drain them. Once the water is boiling, dip the clean peaches, 3 or so at a time, into the pot of boiling water for 40 seconds. Remove the scalded peaches with slotted spoon and put them into a clean sink or bowl with cold water. Keep the water cold as you work, either by using ice or by replacing with cold tap water. Once the peaches have been in the cold water for a few seconds, you will be able to skin them easily. The skins should just slide off the scalded peaches as you rub your hands around them. If that doesn’t work, pick at the skin a little until you have a piece and pull the skin off this way.
 6. Cut the peeled peaches in half, remove the pit, and place the halves (or slices, if you want more work) in a large bowl filled with a solution of one tablespoon Fresh Fruit per 3 quarts of water.
7. Make the syrup. I can peaches in a light syrup: 4 cups sugar to 8 cups water. This makes enough syrup for 7 quarts of canned fruit, which is the maximum load for most canners You can adjust the amounts depending on the quantity of peaches you are canning. Bring the syrup to a boil in a pot on the stove and keep it hot.
8. While the syrup is heating, heat the lids and bands in a medium pot. Once the water in this pot boils, you can turn it off, but let the lids and bands sit in the water so they stay hot.
9. Take a hot jar from the dishwasher (or the pot for heating them) and place it on the counter on a folded kitchen towel. Pack it with peaches. You will want to turn the halves cut side down; they fit and look better that way. You may need to shake and roll the jar a little to get the peach halves where you want them to be. Keep filling the jar with peaches until you are 1/2 inch from the top.
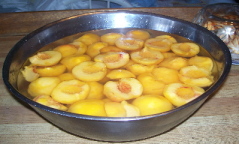
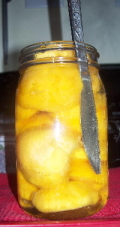 10. Place the funnel in the top of the jar and ladle in hot syrup until it reaches 1/2-1/4 inch from the top. Use the table knife to remove air bubbles from the filled jar by running the knife gently between the fruit and the inside of the jar (See the photo on the right.).
11. Wipe the rim of the jar with a clean wet dish cloth, lift a lid from the pot, place it on top of the jar. Take a band from the pot and screw it on the jar so that it holds the lid firmly in place. You don’t have to make it excruciatingly tight. There is, apparently, such a thing as overtightening your jar bands, since all the books warn against it. (I’ve never done it, at least as far as I know. But how would I know?)
12. Place your filled jar in your jar rack and move on to filling another one. Keep going until the jar rack is filled with jars of peaches. Wearing an oven mitt, carefully place the jars and rack in the canner.
 13. The water in the canner will probably not cover the jars with 1 inch of water, so you’ll need to add enough boiling water from the tea kettle to reach that level. Cover the canner and keep heating until things are really rolling in there. Then time the boil: 30 minutes for quarts and 25 for pints.*
 14. When the time’s up, turn off the burner under the canner and remove the jars from the water. Some people lift the whole jar rack full of hot wet jars all at once, but I consider that a disaster waiting to happen, so I lift the jars out one by one with the jar lifter and place them on a folded towel on my kitchen counter or table, leaving room between them so they cool properly.
15. While they are cooling, you may hear the lids popping as they seal. Once the jars are completely cool, check the centers of each jar lid to make sure it is pulled down firmly. They probably will all be just perfect, but if the middle of any of the lids pops in and out as you press on it, the jar isn’t sealed properly. Put any unsealed jars in the fridge and eat them within a few days.
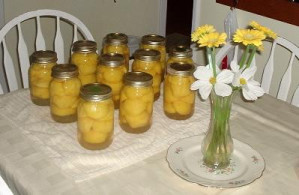
16. Once the jars are cooled, and as soon as you can bear to stop admiring your handiwork, remove the rings from the jars and store your canned peaches in a cool, dark place. If you need additional information, you’ll find a short resource list by clicking on references at the end of this post.
*The photo of jars in a canner is not my own. Mine didn’t turn out, so I got another one from here.
 rebecca
Reader Comments (4)
Now, THAT's impressive!
It really does look like a lot of work - but so did jam making until I had done it the first time. I'm still hoping to get at least one batch done before Thanksgiving. Your peaches look so tasty!
Canning food is something that always makes me feel so "capable." One of my kids' friends grew Roma tomatoes this summer, and today, I'm going to "quick freeze" them for spaghetti sauce.
wow....lots more complicated than how I do it. :) you process longer than I do to. Ah well....as long as they taste good! :) This afternoon I"m hoping to make my first batch of peach jam. Yummy.... (at least I hope so) things you do when you have a boy in the house :)